Showing posts with label BJD. Show all posts

04 January 2017

Na'vitsyìpä nikre sì lapo - postì a2ve #KintrräPostìLeNa'vi (BJD Blog #11)

(For translation, please click on this post or "ivinan nì'ul" at the end of it)

Tse, ma frapo, pamrel seiyi postìr amuve fìkìntrr, taluna ke lu kea lun a tsakem ke sivi. ^^
Zene sì new pamrel sivi nì'ul nìNa'vi tsalsungay.

Ngolop oel mipa nikret Na'vitsyìpfpi oeyä kìngfa. Kìngti pxìmolun'i, slolayk sì sleykolu faoi ulte solung nikret sräsìn.

Ayngaru ayrel mipa me*nikrehawre' (fìlì'u leyewla hrh):


Meu fkan lor oer nìtxan :)
Slä mi kin nikroit. Ayu alu feathers sì aysrok kxawm.

Pori tokxur sälatem ke soli nìtxan, ha tsakemìri kea ayrel amip ke lu. Slä Paluan ahusahaw ayngar:

Hona kefyak? :D
Poti heykìsyahaw utraläo oel...

Tse, fìposti tam fpi set, ha hayalovay ma eylan :3


24 December 2016

Torso troubles and damned details (BJD Blog #10)

Ketsukspaw; mi rey oe! My doll, still a WIP, too.
Been working on her lately more than "usual" (yep, doing nothing except for breathing and sleeping after work has become everyday life), so I picked up work on her torso, did a small touch up of her face (extra blushing, replaced eyelashes, tested another matte varnish) and started to build up joints and moveability.

Also, I got some new acrylic yarn, because I wanted to make her another wig with normal, silky hair, but that wool lost more material and length while combing than anticipated... So I have to figure out how to get that to work unless I want her to have short(er) hair. Would be an option, no? Dunno how I should possibly braid her tswin with those short strands of hair, though...

I was also unsatisfied with the way her old eyes looked - so I made a pair of new eyes. Still need to get that bulge of the cornea right... with varnish, hrh, because I can't find my resin anymore *sob*

Kezemplltxe I also got some pictures for ya'll. :) And yep, there's doll nudity ahead, don't look at it if you cannot cope with that, heh.

Her more refined,
yet rough torso
Her head, neck and upper body connected, necklace attached,
eyesockets empty because new pair of eyes
right next to her, lower body still too rough
to attach; preview of new hair behind her
Moveability of her head,
pretty wide range imho...
also thanks to
the moveable neck
With her current wig :)
And with her new herb pouch!
:D

I'll start posting more regularly here again next year, also thanks to a new project I wanna participate in. Been very silent thanks to a bunch of health issues, physically and mentally. Meh.
Well, until then, my dear friends, I wish you a happy holiday and all the best for 2017! (Which will be a hopefully much better year than 2016 was for me ^^)

21 December 2015

Sculpting the head - Part 5 + Wig + some Jewelry (BJD Blog #09)

Tse, ma frapo, poeri key/re'o lu hasey! Well, everyone, her face/head is done! Almost, that is. She's still missing her ears, hehe, but her "faceup" (painting of the face) is all done.
I even created the wig cap + wig and made some jewelry already. Here are the pics of all of that:

I made the wig cap after her face was done so far... for that I wrapped some plastic foil (saran wrap) around her head and fixed it with some rubber bands. This was for making sure that her face won't be damaged in any way. Above of this I wrapped some fabric around her head. I used some old tights/pantyhose in black. Fixed again with rubber bands. Then I added a layer of glue where all of her hair would go. Let it dry, added another layer. Let dry again, then removed the layers from the head, separated foil and fabric, cut out her hairline very roughly and put the wig cap back on her head. Then I marked where her hairline would go exactly with a white colored pencil and cut along those lines. Done was the wig cap:

Onto a wig cap like that you can glue or sew any hair you want to. Since I had her dreadlocks already prepared and waiting, I added those - row after row, starting from the bottom.
First row of dreads:
As you can see I wrapped her in saran wrap again, because I glued the dreads to the wig cap. Working with glue can get messy, so yeah, safety first ;D

This is what she looked like after most of the dreads were glued onto her head (still missing the topmost dreads):

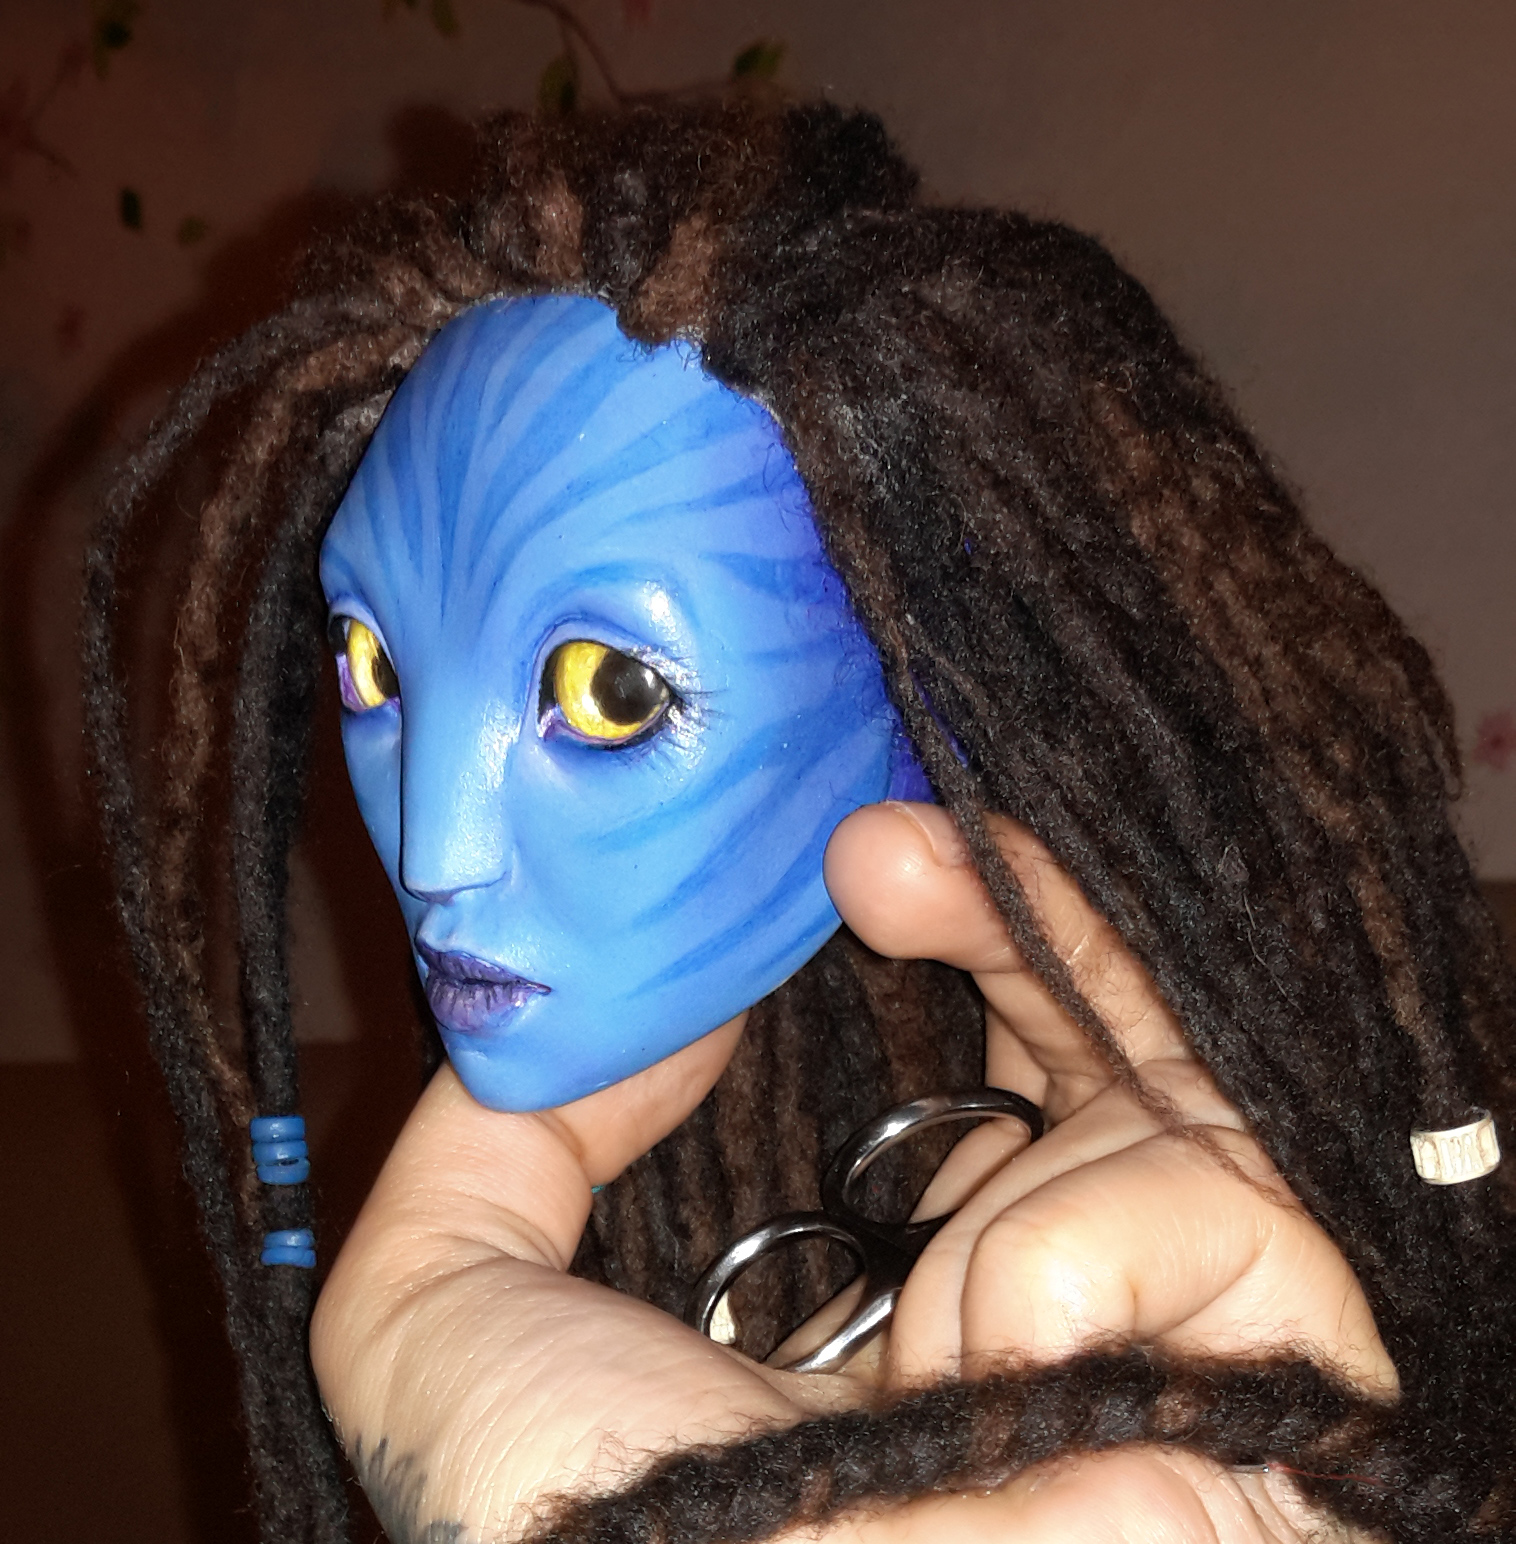
After all dreads were glued onto her wig cap, I added the tswin (long braided queue) and checked the overall length of her dreadlocks, realizing that most of them needed to be cut a bit in length:

After cutting her hair I put the wig aside and focused on adding the sanhì (glowing dots) to her face.
I haven't had any UV active paint or pigments at home, but a small UV black light lamp. So I used it to see if any of my pens and stuff would glow under UV light - and yes, some did! :D No need to buy expensive UV active pigments, yay!
I cut one of my yellow marker/highlighter pens open and removed the middle part which holds the ink. I squeezed most of the ink into a small container and added white and blue acrylic paint. After mixing it well (checking with the UV black light) I put some of it into another small container and thinned it down with quite a bit of water. This mixture was used to add the sanhì to her face with the help of a very thin detail brush:
First row of sanhì... Normal light and UV light. Constantly kept checking if I spilled or smeared any of it all over her face, in order to keep the dots as clean as possible.
Kept adding all of her sanhì one by one, creating a unique and pretty pattern I liked. After every dot was where it should be and everything else was clean, I sealed everything with 2 layers of matte varnish. I added some high gloss varnish to her lips (after I lightened them up a bit) and upper eyelids, as well as to her waterlines, to make them all nice and shiny. After everything was dry, I glued fake eyelashes to the inner side of her upper eyelid.
And yeah, that was everything else I had to do in order to finish her face. Here's the final result:
UV black light
With her wig on

While everything was drying (glue, varnish, blablah) I used the time to create some jewelry. I made some necklaces, a belt, a bib necklace and even a necklace with a bird skull pendant. Here is some of that stuff:

Some necklaces and the belt are adjustable in size (close mechanism). I even bought some small magnets for her head to be closed and opened easily. Also some thin felt for protecting her joints in a matching blue color. And also some feathers. Yeah, I'll prolly add some feathers to her accessories and also a bow and arrows!

I still need to make her ears, hehe. This will be the next step (for real!) and then her torso + neck.
So, again, stay tuned! :)

14 December 2015

Sculpting the head - Part 4 (BJD Blog #08)

Short notice on LAYON YAYO: The newest page is halfway done and will be published asap! ^^ Didn't forget about that, hrh. Luckily only one week left until holiday and looots of spare time. Also I made a dream of meself come true and got a new Wacom Intuos Pro M! So awesome!!!

Now, on the BJD head. ^^

A lot was done again. I fixed the broken eyelids, sanded a bit again, gave it an overall finish, cleaned it and applied 2 base coats of blue acrylic paint. I mixed some blue with lots of white, a bit of black and a bit of red to get a nice blue, somewhat desaturated base color. I tested the color on the back of her head and adjusted the mixture until I was happy with it.

Once the base coating was dry, I applied some first blushing with the pastel powder I've had prepared some while ago.

Then I forgot to take more pictures, again xD Txoa! What followed was more blushing with darker blues and light blue and even white. Then I started to get the details on her face with colored pencils in medium blue, dark blue, black, pink, flesh color thingy, magenta... until I was happy with it. Filled in the blank spaces where her ears will be with basic color, adjusted the blushing and began to add the stripes to her face with medium and dark blue.
In between I sealed everything with varnish over and over again.

I've added some black eyelashes and stuff until I thought it was done. Then I inserted her eyes back again and made some tests how she'll look like with ears and stuff :) So yeah, that's how she looks now.

She looks way better in RL, the camera doesn't get the colors and the proportions right (some kind of fisheye lense effect). I'll make a video in proper daylight once her head is all done!
 I need to coat her eyes with another layer of varnish to make them shiny again. They became a bit dull after adjusting the eyelids. I also think that her lips look somewhat too dark. Need to fix that.
Also, her tanhì/glowing dots are still missing and whatever I'll find worth adjusting ^^

But, first will come the ears. As you can see I attached them too the joint balls and next will be detail work on them. So, yet again, stay tuned for the next part! :)

08 December 2015

Sculpting the head - Part 3 (BJD Blog #07)

I refined and sanded the nose and added more to the brows and connection between nose and cheeks. I also added the base of the mouth. I really like her nose, I think it looks great :)
I also filled up the holes where the ear joints will go, because they became too big due to adjusting the exact position.

The inner eyelids keep breaking or crumbling, because they're too thin. Overall I need to thicken up those lids, so they won't break once everything's painted and done.
I want her to have a somewhat neutral expression, so I'll try to make the mouth as "relaxed" as possible.

Sanding is a really great thing. Every little dent and unevenness will simply disappear and the ugly duckling becomes beauty with skin as smooth as silk. You'll see once all the sanding on her face is done :)

Time for dem sexy lips.

 Then I was so concentrated on sculpting and sanding that I forgot to take more pictures. Oeru txoa livu! >.<
I literally kept going until she was done. Adjusting symmetry, adding details, a little bit of carving and lots, lots of sanding. Additionally I drew a line on her head where I would cut it in half in order for stringing, jointing and so on.
Face done!

After I was done with sanding, I began cutting along the line daaaaamn carefully. I didn't wanna break her head, hrh... o.- Well, I actually did, but whatever ^^

Then it was time to peel out that damn styrofoam piece after piece, rather too little than too much at a time. The clay on the inside at the back of her head was still somewhat wet. Oo
After I was done with that, it was time to remove the wooden beads that helped as a replacement for the actual eyes. That proofed to be the trickiest part up to that point. Because the beads kinda bond with the clay very hard... So yeah, I messed up, I broke out a bit of her eyelids. But that's nothing that can't be fixed!

Now look at her in all her glory, hrh. I am totally in love with her. How about you? :)

 First eye test after removing the first wooden bead.

Final eye test. With a broken eyelid. But whatevaaaa ^^ Love her. <3

But the head is not done yet, of course. I need to thicken the inner layers a bit here and there to give her head more stability, prepare the joins for the neck and ears, and of course, paint her ^^
So, again, stay tuned for the next part!

07 December 2015

Sculpting the head - Part 2 (BJD Blog #06)

 After the eyelids were added, I layered the epicanthal fold on top. This picture also may let you fathom how big her head actually is (a bit bigger as the bluescript head, so I guess she'll become between 70 and 75cm tall in total).

 Added more to the forehead and the core of her new nose. ^^

 More defined nose, a bit asymmetrical, still. Will adjust that later. The clay looks a bit dirty because of the aid lines drawn with (colored) pencils (the clay picked up those pigments here and there).

 Also, more cheek and chin as preparation for adding the mouth.

Now she's drying again. If you look closely, you can see the core structures for her ears and neck (behind her head hrh) :3

Tewti, what a day full of sculpting that was. Hope I'll be able to continue tomorrow ^^ Ha, kìyevame! ;)

06 December 2015

Sculpting the head - Part 1 (BJD Blog #05)

Yeah, here's the progress of scultping the head for ya'll :) Slowly but surely it's assuming a form I'm pleased with. Forgot how much work it is until you get the proportions, symmetry and stuff right, though ^^

I started with a styrofoam egg and drew a basic draft of a face on it, to be able to visualize better what will go where and so on. I stuck a knitting needle and later a triangular rasp into the base of the head where the neck would go, to be able to hold the head better during sculpting. That looked like this:
 (Excuse the poor quality, forgot to take extra pictures of the styrofoam core ^^')

After my clay arrived here I applied some basic layers of it onto the styrofoam core until it looked like a basic shape of a face I could work with later on. Of course I inserted beads where the eyes and joints of the ears would go. For doing so, I cut some of the styrofoam away, so I could insert the beads with a bit of putty.

I let everything dry over night, sanded away some dents and bumps and added more clay to get a more realistic back of the head and skull shape overall. Again, I let it dry over night.

Then it was time to define the face a bit more, because the final size of the face will define the overall size of the skull/back of the head and everything else.
I added eyelids to the beads and then noticed, that the nose was a obstacle rather than of any help, so I removed it and decided to draw aid lines all over the head. This is supposed to help me get the symmetry right, because symmetry is a hard thing to achieve, but it's crucial for sculpting. Also, symmetry = beauty. :)
This stage reminds me a bit of Voldemort, hrh.

While the eyelids are drying, I'm trying to think of a good way to protect the joints and the paint there from abrasion later on. I guess just varnish won't help, so I'll maybe add blue, thin felt to the joints?

Once the eyelids are cured, I'll add the brows, epicanthal fold and pica semilunaris/lacrimal caruncle.
Image source: http://www.isec.my/

Once that is cured, I'll add the nose, then the mouth and afterwards I'll adjust the chin, cheecks, forehead and so on. So, stay tuned for Part 2! :)